
[InteliJ + Spring Boot + Gradle] Rest API Server 구축하기(3) - API 컨트롤러 및 서비스 생성 및 dto 활용
2022. 1. 14. 23:40ㆍBackend Develop/REST API
반응형
개발환경
IDE : InteliJ
Spring Boot : 2.6.2
JDK : 17
1. DTO 생성

dto 패키지를 생성해주고 안에 UserInfo.java 자파클래스를 한개 생성한다.
package com.kwaneung.apiserv.user.dto;

import lombok.Data;

@Data
public class UserInfo {
    String name;
    Integer age;
    String role;
}- @Data : Lombok 어노테이션. getter와 setter를 생성해준다.
2. Service 수정

Service에 dto를 활용하는 로직을 추가한다.
package com.kwaneung.apiserv.user.service;

import com.kwaneung.apiserv.user.dto.UserInfoDto;
import org.springframework.stereotype.Service;

@Service
public class TestService {

    public String myName(String name) {
        if (name != null) {
            return "my name is " + name;
        } else {
            return "name param is null";
        }
    }

    public String myAge(Integer age) {
        if (age != null) {
            return "my age is " + age;
        } else {
            return "age param is null";
        }
    }

    public String myRole(String role) {
        if (role != null) {
            return "my role is " + role;
        } else {
            return "role param is null";
        }
    }

    public String myInfo(UserInfoDto userInfoDto){
        userInfoDto.setName("test");
        return myName("name : " + userInfoDto.getName()) + "\nage : " + myAge(userInfoDto.getAge()) + "\nrole : " + myRole(userInfoDto.getRole());
    }

    public String myInfoWithaddress(String address, UserInfoDto userInfoDto){
        return myInfo(userInfoDto) + "\naddress : " + address;
    }
}
dto폼 형식에 맞는 데이터를 한번에 가져와서 lombok을 이용해 get, set이 가능하다.
3. Controller 수정

dto를 활용하는 컨트롤러를 추가했다.
package com.kwaneung.apiserv.user.controller;
import com.kwaneung.apiserv.user.dto.UserInfoDto;
import com.kwaneung.apiserv.user.service.TestService;
import org.springframework.http.HttpStatus;
import org.springframework.http.ResponseEntity;
import org.springframework.web.bind.annotation.*;
@RestController
@RequestMapping("/user")
public class TestController {
private final TestService testService;
public TestController(TestService testService) {
this.testService = testService;
}
@GetMapping("/name")
ResponseEntity<?> getHelloWorld(@RequestParam(required = false) String name){
return new ResponseEntity<>(testService.myName(name), HttpStatus.OK);
}
@PostMapping("/age/{age}")
ResponseEntity<?> postHelloWorld(@PathVariable("age") Integer age){
return new ResponseEntity<>(testService.myAge(age),HttpStatus.OK);
}
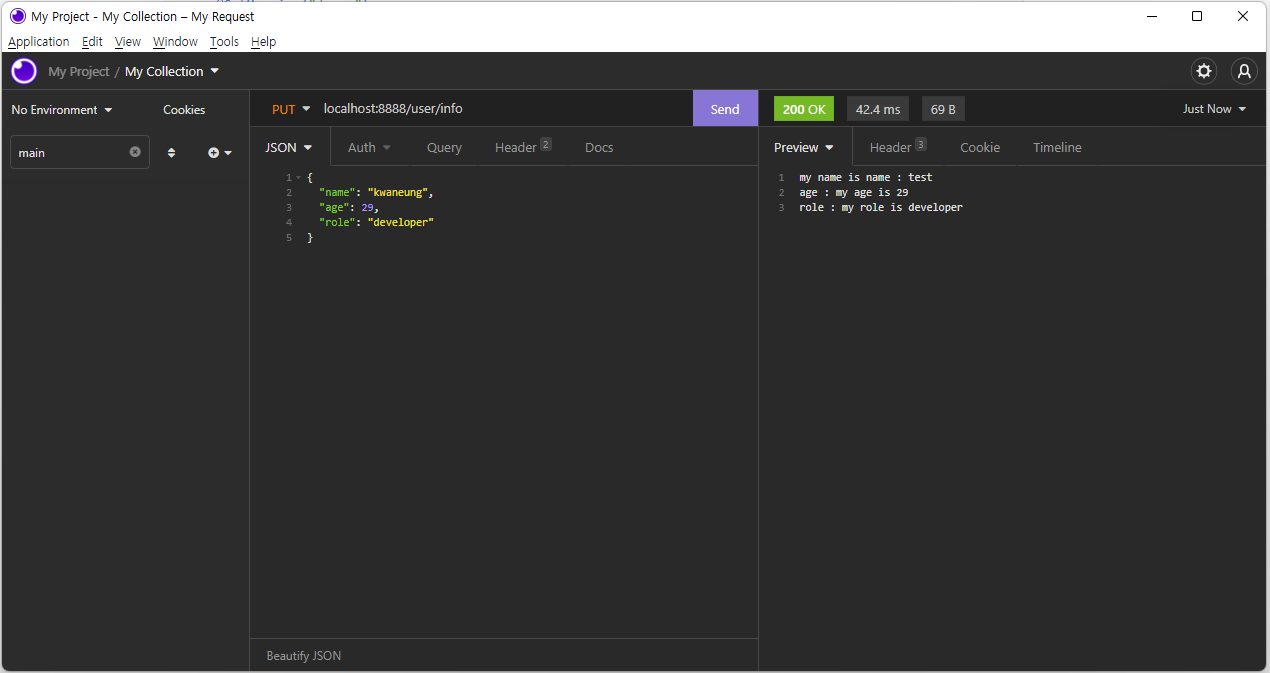
@PutMapping("/info")
ResponseEntity<?> putHelloWorld(@RequestBody UserInfoDto userInfoDto){
return new ResponseEntity<>(testService.myInfo(userInfoDto),HttpStatus.OK);
}
@DeleteMapping("/name")
ResponseEntity<?> deleteHelloWorld(@RequestHeader String address, @RequestBody UserInfoDto userInfoDto){
return new ResponseEntity<>(testService.myInfoWithaddress(address, userInfoDto),HttpStatus.OK);
}
}
- @RequestBody : request body에 담긴 데이터를 객체에 맵핑한다.
- @RequestHeader : request header에 담긴 데이터를 변수에 맵핑한다.

반응형
'Backend Develop > REST API' 카테고리의 다른 글
| [InteliJ + Spring Boot + Gradle] Rest API Server 구축하기(4) - mapper를 활용한 DB 연동 (1) | 2022.01.30 |
|---|---|
| [InteliJ + Spring Boot + Gradle] Rest API Server 구축하기(2) - API 컨트롤러 및 서비스 생성 (0) | 2022.01.14 |
| [InteliJ + Spring Boot + Gradle] Rest API Server 구축하기(1) - 개발 준비 (0) | 2022.01.10 |
| REST API란? (0) | 2019.09.02 |